Infrared Photography has almost completely shifted from Film to Digital in the last few years. I can easily say that Digital IR experimentation only started less than 5 years ago. Fully half of that time, the IR work that was going on was almost 100% done with what was called the "Prosumer" camera, or the high end of what we now generally consider "Point and Shoot" cameras. This was mainly due to the fact that DSLRs either didn't exist, or the ones that did exist were so expensive that few hobby shooters could afford them. Of course that is rapidly changing now that Digital DSLRs are commonly available and affordable. All of the advantages that photographers found in the change from Film to Digital carry over into IR Photography. So the switch-over has been rapid, with very little return to film, exactly like what has happened to Visible Light Color Photography. So is film dead? And more to the point, is IR Film dead? I'm afraid that I don't have that answer any more that anyone else. Film is still available in most of the popular sizes, Color and Black and White more so than IR Film. You will probably have to do some searching to find IR Film, but it is still available. One source I have found is http://www.freestylephoto.biz/ They carry efke IR 820 B&W Negative Film, which is basically sensitive to 820nm in the IR Light Spectrum. It's pretty pricey at around $10 per roll + shipping. They recommend that you shoot this film thru an IR Pass Filter such as the Hoya R72. The film develops in standard B&W negative chemicals such as Kodak D-76. So for the sake of the IR Buzz, I decided to bail off into the IR Film world, at least enough to understand the basic issues and to be able to report them to you in a pictorial format. I have recently been smitten with the charms of the plastic toy cameras, specifically the Holga film cameras.
  The Holgas use 120 medium format film, and IR B&W negative film is available in 120, so it seemed only natural that I would do a bit of playing and experimentation with the Holga, shooting that expensive IR Film. When I started shooting film again with the Holga, I immediately bumped up against the issues that I, as a film shooter dealt with 25 years ago. OK, I got a roll of film, I went out and exposed all of the frames on the roll, and now it's time to have it developed and printed. Well, in the "old days" I usually just took it to my local drug store and let them develop and print my works of art. Thinking about it, it didn't take long to realize that this new wrinkle to my hobby was negating the "film is free" concept of digital, and was going to start costing me some serious money if I decided to shoot any amount of film! I had taken some Community College Photography courses in my early days, and one of the things I did at that time to maximize my available time in the college darkroom, was to develop my own B&W negatives so that I would have them ready for class time, and not have to develop the film and "waste" a week's evening class time. I had purchased a light tight develop tank, and a graduated cylinder to measure the chemicals. I recalled how easy it was, and how inexpensive the chemicals were. A quick search of my garage turned up the tank and measuring cylinder. Good thing they never sold in the numerous garage sales they were in! I never imagined that I would ever have a use for them again, but I'm basically a pack rat for this very reason. So, with some diligent searching around on the internet, I found time and temperature charts for developing my B&W film. I probably shot and developed around 15 rolls of standard B&W, with pretty good success, so I was ready to develop my IR Film negatives. The charts for the efke film on freestylephoto’s web site were quite similar to the charts I had been using for my B&W negatives, so with a measure of confidence I developed the first IR roll. I’m proud to say that the negatives looked good after they dried.
I have to back up here just a little bit. When I got those first rolls of standard B&W negatives developed, I once again faced a bit of a problem. That being that I do not have a darkroom or any of the equipment I would need to make prints from them. So, once again it was time to do a little thinking and research. One thing I could do was to take my negatives to a place that develops film and makes prints, and let them print them to paper for me. If I did that, I might as well have just let them do the negative development as well. I should interject here that if you let a commercial company develop your IR negatives, BE SURE that you tell them that you have IR Film. Most of the automated equipment that they use has internal IR LEDs that recognize and count frames while the film is being developed. If they simply put your IR Film into the automated machine, your undeveloped film strip will be fogged by the light of the IR LEDs. So, if they do not specifically say that they will develop your roll manually, don’t let them develop your film. If they don’t know what you are talking about, run away, don’t walk.
If you do decide to have your film developed, you may consider having them also scan the negatives to digital files, and burn a CD disk for you. So you are now set, you have developed negatives, some paper prints, and a CD with digital JPG files. If you have a decent printer on your PC, you just may want to eliminate the cost of the paper prints, and print from the CD yourself. Remember, you have no idea what you are going to get back, you had no way to review the shots you took on the film, like you do with digital. So, you may be paying for prints that are award winners, but then again, some of them may be images that you would trash. It becomes obvious that your best bet would be to get negatives and digital scanned files on CD. That way you can treat the digital files just as you would any other image file that you deal with in the digital camera world. Plus you have the negatives for long term backup.
I happened to have a flat bed scanner that I vaguely seemed to remember had the ability to scan “pictures and negatives”. So I dug out the instruction book and the long ago stored away negative holders and proceeded to try scanning the negatives that I developed. Well, it didn’t take long to realize that my scanner was capable of scanning 35mm negatives and slides, but was not set up to handle the larger 120 medium format film negatives. Oh it would scan them OK, but it also insisted on cropping the result to a 35mm size. No way around it. Well I was by this time too deep into Holga’s siren call and crappy picture grip to turn back at this point, so I started looking for a replacement scanner that was capable of 120 medium format negatives as well as prints and 35mm negatives. Having priced the commercial development and scan to CD, it became clear that a sparkling new scanner would pay for itself rather quickly. I found an Epson 4490 flat bed scanner for a good price, and it has been doing an excellent job of turning my analog negatives into digital files I can work with in Photoshop.
Whew! That was really a long drawn out description of just coming out and saying that I develop my own B&W film, both standard and IR. I also scan my negatives to obtain digital files that I handle just like any of the files that I get from my digital cameras. I just wanted to wade thru all of that to help you decide what your options are and what kind of decisions you might make in your own film shooting. Also, I want to tell you that it’s not hard to do, you are capable of doing all the steps yourself, and save a bunch of money in the process.
Let’s talk about actually shooting the IR Film with the Holga camera. I mentioned that freestylephoto recommended using a Hoya R72 IR Pass filter with the efke IR Film that I ordered. The Holgas are really primitive plastic cameras, and the thought process in their design did not take into account that someone might one day want to use a filter in front of the plastic “Optical Lens”. Fortunately if you have any sense of adventure in you at all you will find a way. My Hoya R72 was 58mm to fit my Sony 717 lens threads. So, I ordered a cheap metal “step ring” that converts from 46mm threads to 58mm threads. I had found from some internet searches and forum discussions that the Holga lens is very close to 46mm inside diameter. The plastic is also soft, so it’s no mean trick to just screw the step ring onto the Holga lens, cutting your own threads into the soft plastic as you go. Pretty neat! Now any of my 58mm based accessories for my Sony can be mounted on the Holga, including for this discussion the Hoya R72.
Looking at some of the charts and recommendations on the freestylephoto site for the efke film, and considering the fixed 1/100 shutter speed and F13 aperture of the Holga, it was apparent that exposures might need to be a bit long. So, the Holga, having a ¼ 20 tripod mount insert, I got out my cheap tripod. I also dug out the adapter and shutter cable release (also available from freestylephoto), pushed the little switch on the Holga to “B” for Bulb, and prepared to experiment with exposures on that expensive film. Long story short, in good daylight I found that a 1 to 2 second exposure with the cable release and on the tripod seemed go give me an acceptable image.
  In bright sunlight, I’d probably go for 1 second. On a muted overcast day, 2 seconds and a bit longer may be best. So, on two different days, and under overcast and somewhat clear conditions, I shot the 2 rolls of IR film I bought. I developed the negatives and scanned them on the Epson scanner. Photoshop helped me clean them up a bit, but the examples I am posting here are not significantly altered from what I got from the negatives off the scanner.
affordable. All of the advantages that photographers found in the change from Film to Digital carry over into IR Photography. So the switch-over has been rapid, with very little return to film, exactly like what has happened to Visible Light Color Photography. So is film dead? And more to the point, is IR Film dead? I'm afraid that I don't have that answer any more that anyone else. Film is still available in most of the popular sizes, Color and Black and White more so than IR Film. You will probably have to do some searching to find IR Film, but it is still available. One source I have found is http://www.freestylephoto.biz/ They carry efke IR 820 B&W Negative Film, which is basically sensitive to 820nm in the IR Light Spectrum. It's pretty pricey at around $10 per roll + shipping. They recommend that you shoot this film thru an IR Pass Filter such as the Hoya R72. The film develops in standard B&W negative chemicals such as Kodak D-76. So for the sake of the IR Buzz, I decided to bail off into the IR Film world, at least enough to understand the basic issues and to be able to report them to you in a pictorial format. I have recently been smitten with the charms of the plastic toy cameras, specifically the Holga film cameras. The Holgas use 120 medium format film, and IR B&W negative film is available in 120, so it seemed only natural that I would do a bit of playing and experimentation with the Holga, shooting that expensive IR Film. When I started shooting film again with the Holga, I immediately bumped up against the issues that I, as a film shooter dealt with 25 years ago. OK, I got a roll of film, I went out and exposed all of the frames on the roll, and now it's time to have it developed and printed. Well, in the "old days" I usually just took it to my local drug store and let them develop and print my works of art. Thinking about it, it didn't take long to realize that this new wrinkle to my hobby was negating the "film is free" concept of digital, and was going to start costing me some serious money if I decided to shoot any amount of film! I had taken some Community College Photography courses in my early days, and one of the things I did at that time to maximize my available time in the college darkroom, was to develop my own B&W negatives so that I would have them ready for class time, and not have to develop the film and "waste" a week's evening class time. I had purchased a light tight develop tank, and a graduated cylinder to measure the chemicals. I recalled how easy it was, and how inexpensive the chemicals were. A quick search of my garage turned up the tank and measuring cylinder. Good thing they never sold in the numerous garage sales they were in! I never imagined that I would ever have a use for them again, but I'm basically a pack rat for this very reason. So, with some diligent searching around on the internet, I found time and temperature charts for developing my B&W film. I probably shot and developed around 15 rolls of standard B&W, with pretty good success, so I was ready to develop my IR Film negatives. The charts for the efke film on freestylephoto’s web site were quite similar to the charts I had been using for my B&W negatives, so with a measure of confidence I developed the first IR roll. I’m proud to say that the negatives looked good after they dried.I have to back up here just a little bit. When I got those first rolls of standard B&W negatives developed, I once again faced a bit of a problem. That being that I do not have a darkroom or any of the equipment I would need to make prints from them. So, once again it was time to do a little thinking and research. One thing I could do was to take my negatives to a place that develops film and makes prints, and let them print them to paper for me. If I did that, I might as well have just let them do the negative development as well. I should interject here that if you let a commercial company develop your IR negatives, BE SURE that you tell them that you have IR Film. Most of the automated equipment that they use has internal IR LEDs that recognize and count frames while the film is being developed. If they simply put your IR Film into the automated machine, your undeveloped film strip will be fogged by the light of the IR LEDs. So, if they do not specifically say that they will develop your roll manually, don’t let them develop your film. If they don’t know what you are talking about, run away, don’t walk.
If you do decide to have your film developed, you may consider having them also scan the negatives to digital files, and burn a CD disk for you. So you are now set, you have developed negatives, some paper prints, and a CD with digital JPG files. If you have a decent printer on your PC, you just may want to eliminate the cost of the paper prints, and print from the CD yourself. Remember, you have no idea what you are going to get back, you had no way to review the shots you took on the film, like you do with digital. So, you may be paying for prints that are award winners, but then again, some of them may be images that you would trash. It becomes obvious that your best bet would be to get negatives and digital scanned files on CD. That way you can treat the digital files just as you would any other image file that you deal with in the digital camera world. Plus you have the negatives for long term backup.
I happened to have a flat bed scanner that I vaguely seemed to remember had the ability to scan “pictures and negatives”. So I dug out the instruction book and the long ago stored away negative holders and proceeded to try scanning the negatives that I developed. Well, it didn’t take long to realize that my scanner was capable of scanning 35mm negatives and slides, but was not set up to handle the larger 120 medium format film negatives. Oh it would scan them OK, but it also insisted on cropping the result to a 35mm size. No way around it. Well I was by this time too deep into Holga’s siren call and crappy picture grip to turn back at this point, so I started looking for a replacement scanner that was capable of 120 medium format negatives as well as prints and 35mm negatives. Having priced the commercial development and scan to CD, it became clear that a sparkling new scanner would pay for itself rather quickly. I found an Epson 4490 flat bed scanner for a good price, and it has been doing an excellent job of turning my analog negatives into digital files I can work with in Photoshop.
Whew! That was really a long drawn out description of just coming out and saying that I develop my own B&W film, both standard and IR. I also scan my negatives to obtain digital files that I handle just like any of the files that I get from my digital cameras. I just wanted to wade thru all of that to help you decide what your options are and what kind of decisions you might make in your own film shooting. Also, I want to tell you that it’s not hard to do, you are capable of doing all the steps yourself, and save a bunch of money in the process.
Let’s talk about actually shooting the IR Film with the Holga camera. I mentioned that freestylephoto recommended using a Hoya R72 IR Pass filter with the efke IR Film that I ordered. The Holgas are really primitive plastic cameras, and the thought process in their design did not take into account that someone might one day want to use a filter in front of the plastic “Optical Lens”. Fortunately if you have any sense of adventure in you at all you will find a way. My Hoya R72 was 58mm to fit my Sony 717 lens threads. So, I ordered a cheap metal “step ring” that converts from 46mm threads to 58mm threads. I had found from some internet searches and forum discussions that the Holga lens is very close to 46mm inside diameter. The plastic is also soft, so it’s no mean trick to just screw the step ring onto the Holga lens, cutting your own threads into the soft plastic as you go. Pretty neat! Now any of my 58mm based accessories for my Sony can be mounted on the Holga, including for this discussion the Hoya R72.
Looking at some of the charts and recommendations on
the freestylephoto site for the efke film, and considering the fixed 1/100 shutter speed and F13 aperture of the Holga, it was apparent that exposures might need to be a bit long. So, the Holga, having a ¼ 20 tripod mount insert, I got out my cheap tripod. I also dug out the adapter and shutter cable release (also available from freestylephoto), pushed the little switch on the Holga to “B” for Bulb, and prepared to experiment with exposures on that expensive film. Long story short, in good daylight I found that a 1 to 2 second exposure with the cable release and on the tripod seemed go give me an acceptable image. In bright sunlight, I’d probably go for 1 second. On a muted overcast day, 2 seconds and a bit longer may be best. So, on two different days, and under overcast and somewhat clear conditions, I shot the 2 rolls of IR film I bought. I developed the negatives and scanned them on the Epson scanner. Photoshop helped me clean them up a bit, but the examples I am posting here are not significantly altered from what I got from the negatives off the scanner.So there you have it! All of the information you need to shoot IR Film with a cheap Holga camera. IR FIlm is also available in 35mm format, so if you are willing to do some experimentation, you could use your old trusty 35mm SLR to do some IR. Do be aware that some of the later SLR's had IR LEDs inside to count frames. If yours does, it could cause the film to be fogged just as previously described. So, the older model 35mm manual cameras without the IR LEDs might be the best choice for IR Film.
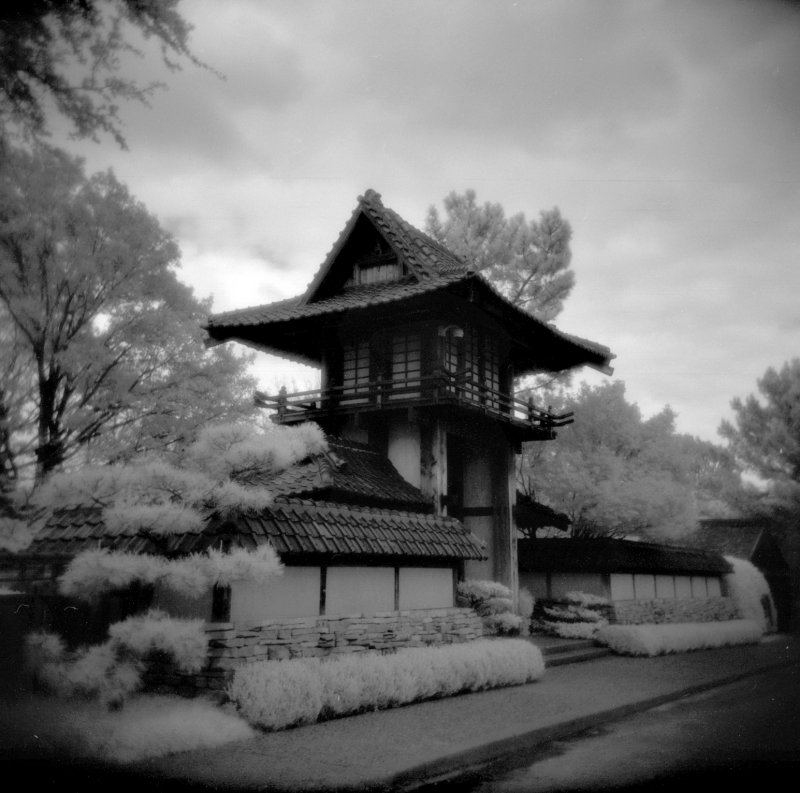
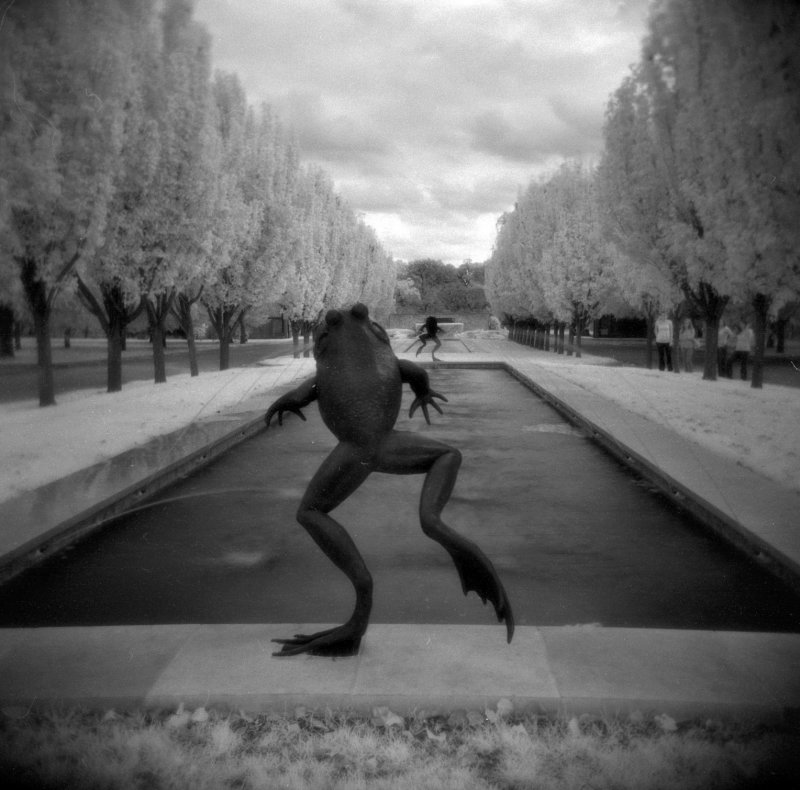
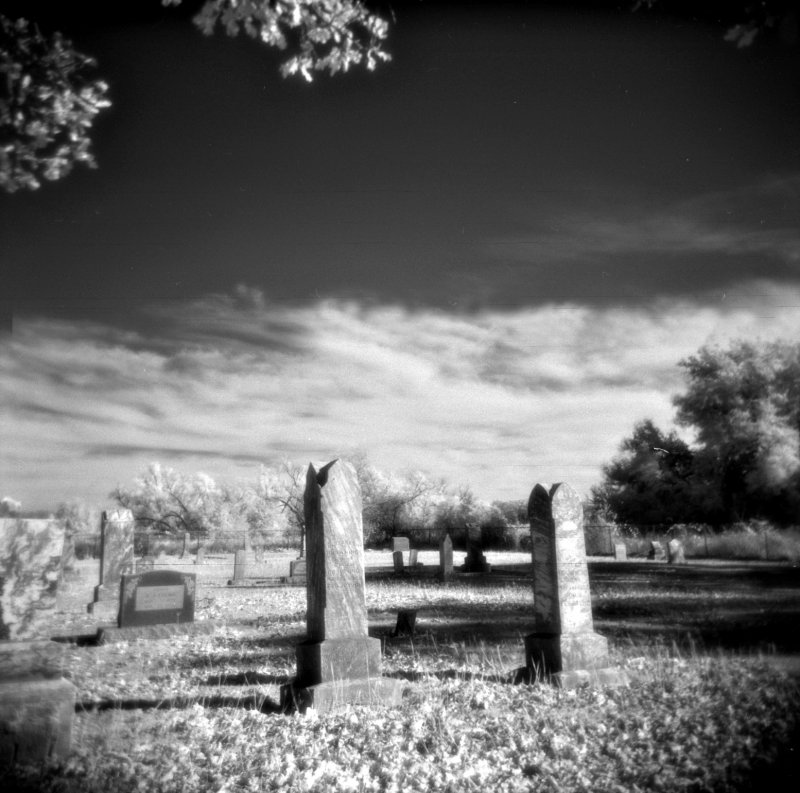
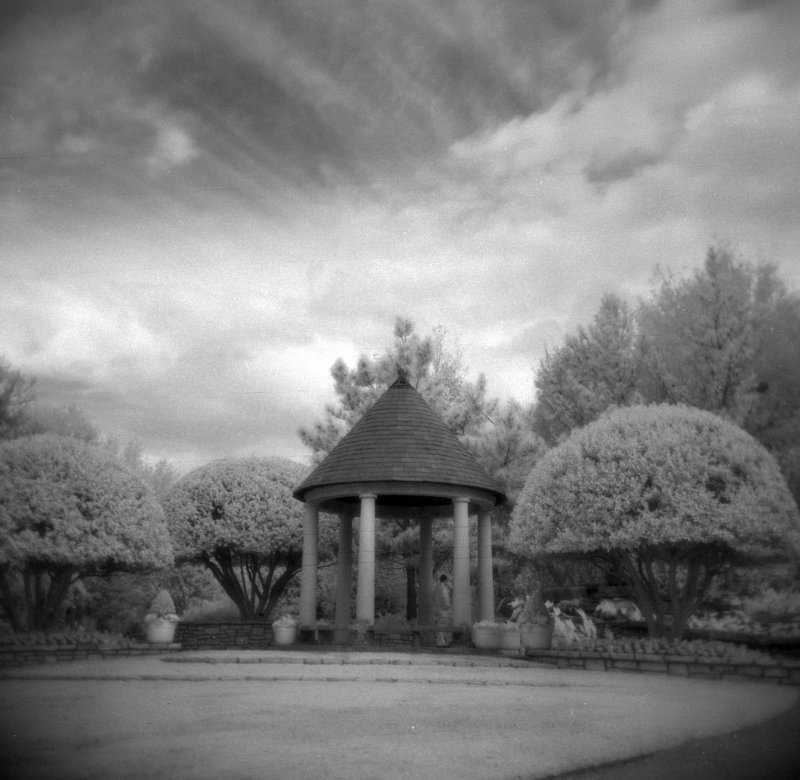
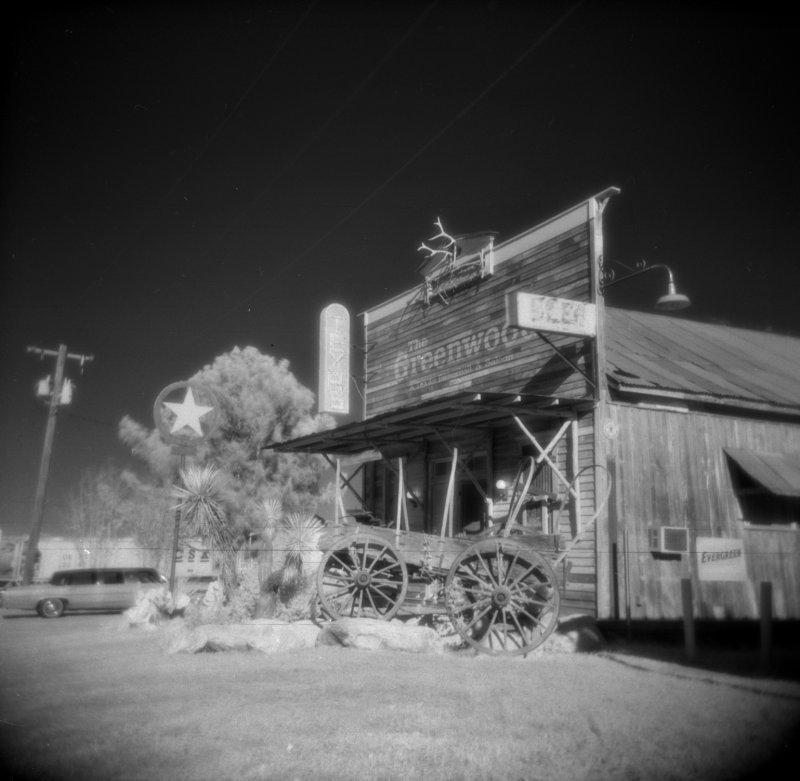
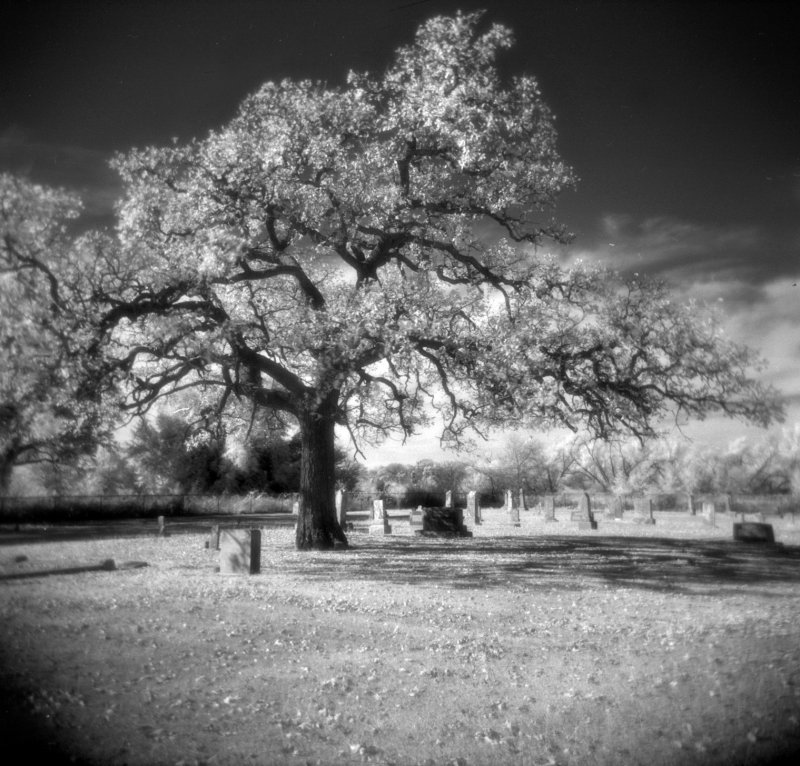
Here are a few of the Images I got from the Holga. I believe that these could stand some further post processing in Photoshop to get the white foliage, and improve the exposure somewhat. I tried to limit the amount of post processing I have done on these images in order to show you approximately how they turn out.
Copyright Statement: All images and materials displayed and showcased here, are copyrighted and are the exclusive property of the artist. Images and material may not be reproduced or used in any way without the written consent of the artist.
-=- Jerry -=-


3 comments:
Great experiment Jerry. I don't think I'll go back to film myself, but I do like the classic look and it is great to see it still being done!
~Kort
fantastic that you are helping to keep IR alive.
I cut down Kodak AIR color infrared film for use in 120 medium format cameras.
www.tarquinius.de
What an photographic adventurer you are -- a very inspiring article.
Post a Comment